CMS Help
Advanced Content Management System
This background is for all page authors.
 If the content area in in the Standard mode the display will look something like this. See the next help entry for a description of how to use the Form Mode. The HTML mode is designed to accept raw HTML (the base language of the web) and is rarely needed. The Form mode is available only to administrators and is used to create response forms. It is fully described in the next section of this help.
If you run your cursor over each of the elements in the top of the section you will see a brief help balloon. If the button has a small triangle next to it, the button is a drop down with several functions under it. Most will work like you would expect a word processor to work. However there are some differences. What is being produced is HTML (hypertext markup language for web browsers to understand). The Styles you see in the drop down were created by the site designer to ensure a consistent look throughout the site.
Before you go any further, you< are probably saying, the window is too small, how do I see what I'm doing. There are two solutions. The first is to lick on the rightmost button in the top line of the editor (the one that has four arrows pointing outward ). That will make the content area fill up the entire browser screen. Clicking on it again will return to the normal view. The second method is to drag the bottom right corner of the editor box, where the lines are and change the size of the box. This change will last till you close the browser.
One of best method to enter blocks of text is to enter the text as text, then add tables and their text, insert any image then finally apply formatting. One of the worst ways is to try and paste in content from MS Word. If you must, click on third button from the left on the second row and then paste in the text. This will strip out all the strange MS Word bits out of it. To clean out the mess MS Word may have put in, highlight the text and click on the "Clear Formatting" button (3rd row 4th from the left). Re-apply formatting as needed.
Here are summaries of how to use the most important/unique functions in the editor.
- <> button opens a pop up which shows the HTML that the editor has created. This allows you to go in and fix things if the editor gets stubborn.
- Hint: You may find, for example, you cannot enter more text beyond the end of a table you have created. Solution: Click on the HTML button and scroll to the bottom of the code and put in a couple of characters and click update. When the normal screen displays your will see your characters and you can change them to whatever you need.
- In order to help finding your way around the HTML this help will briefly describe the various HTML constructs you may see if you "lift the hood". Remember most constructs come in pairs. They are all set off by open and close angle brackets < >.
- Tables are controlled by the leftmost two button on the third row. You can also alter an existing table by clicking on it and then using the right most mouse button.
- Background: tables are built across and then down. Each row begins with a <tr> and ends with a </tr>. Within a row are table data sections for each column in the table. They are marked off by <td> and </td>.
- To create a table click where it will appear and then right click and select Insert Table from the popup (you can also use the 2nd button from the left on the bottom row). Drag to select the number of rows and rows.
- Once a table has been created, selecting the table will allow you to combine cells or change features of the selected row.
- Lists (unordered and ordered) function like outlines. Use the fourth button (unordered list) and fifth button (numbered list) from the left end of the 2nd row. The next two buttons move the list element button one step the the left (outdent) and to the right (indent) respectively. The drop downs option allow you to select non-default markers (e.g., 'A', 'B' instead of '1', '2' for an ordered list).
If you want to move text new a new line without starting a new element, must hold the 'Ctrl' key down and then 'Enter'. This line is an example of this. 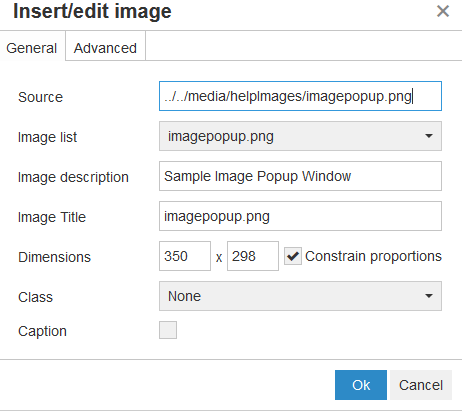 Images from the current media folder can be selected by clicking on the button that looks like a tree. A popup similar to this one will appear.
- While you can just paste the full URL of the image in the Image URL box, it is more normal to select an image from the Image list from the current image library. If its not the current library then go to the 2nd window (remember we recommended clone window and select Media button) find the image and then right mouse button over the image name and select copy link address and paste that into the source box.
- Enter a description of the image for the visually impaired and search engines and optionally Image Title which is text you want to appear when the cursor goes over it.
- Alert: Use the Advance tab to find tune the display.
- In the style box enter: 'float:left;' if you want the image to appear to the left of text. 'float:right; if you want the image to appear to the right of the text. To get the borders we use enter "float: right; border: 2px red solid; margin-left: 2px; border-radius: 10px; border-width: 2px;" in the style box.
- If you are going to use the image to link (point to) something else then set the boarder to zero. Then click Insert.
- To edit and existing image click on it (or drag through it) and then right mouse click to get to the Insert/Edit Image dialog.
- Insert/Update to confirm the changes.
- Links can be of four types: links that point to someplace else on the page (also called Anchors), links that replace the current web page with another, links that open a new window and finally links which open a popup window over the current page. As always create your destination before you try to point to it.
- In-page links, aka. Anchors, are created by first selecting where you want to go and then clicking on the button that looks like an Anchor. A pop up will ask you to name it, do so and close the anchor. If you look at the help page which lists all the tags your will see examples of this. Once your have created an anchor, highlight the work/image that your visitor will click on to go to the anchor. Then click on the button that looks like a chain in the second row of buttons. One of the drop downs will be a list of the anchors on the page, select the correct one and close the popup by clicking on Insert.
- Links that replace the current page or open a new window are created similarly. First, create the word or image on the page you want your visitor to click on to activate the link. Then get the full URL (beginning with HTTP: or HTTPS:). Highlight the launch word/image and click on the Chain button. In the popup put the full URL and in the Target drop down select 'Open in this window..' if you want the current web page to be replaced by the new or 'Open in a new window ...' if you want the web page to open in a new window.
- Links that create a pop up over the current page are nearly as easy. However, if you are using a content page, you first must ensure the target's first content area has the tag |.popup.| in it. This will ensure that the resulting page has the automatic Close button and the default template is NOT used. Use the |.mkPop:x:y:linkText::linkAddress.|. Replace 'x' with the width of the popup and 'y' with the hiegth of the popup. Replace 'linkText' with the word(s) that the visitor will click on, e.g, 'here'. Replace 'linkAddress' with the full web address that will contain the popup.
 Media from the current media folder can be be selected by clicking on the button that looks like a strip of film. A popup similar to this will appear.
- Paste in the source of the media.
- Under the Advanced tab you will see a box where you can paste the complete command to embed the media.
- Cutting/Copying and Pasting Text. The three left most buttons on the second row can be used to Cut, Copy and control how text is pasted into a page.
- The scissors button (cut) or Cntrl-X key combination, removes any highlighted text and puts it into your computer's paste buffer.
- The two sheets button (copy) or Cntrl-C key combination. copies any highlighted text and puts it into your computer's paste buffer.
- The last button controls how the browser's paste function works. When its not active pasting text from your computer's paste buffer will result in a direct copy of the raw information into the browser. Word Processors, particularly Microsoft Word drop a lot more than text into your page. Normally this is not desirable since it can destroy the existing formatting on the page. If the button is active (dark background) all the formatting is stripped off before the text is pasted onto the page.
- Paste can use the browser's Edit-Paste function (or Ctrl-V key combo). The information will be pasted wherever the cursor currently is.
- Miscellaneous Functions. These act in blocks of text. These are in addition to the ones described above.
- Top Row: (left to right) Bold, Italics, Underline, Strike through. left/center/right/full/no alignment, General Format (paragraph, headings from large [1] to small [6], pre-format [mono-spaced and ingore control characters], Font-Family, Font Sizes.
- 2nd row: (7th from left) Block Quote [indent both left and right], undo, redo, Formats [site specific formats. high light the text/image and then select from drop down; if greyed out it applies to only certain kinds of items for example images.]
Support if by contract only. Use of this software is without any waranttee of any kind.
CyberStrategies releases the content under Creative Commons, Share-Alike (CC-by-SA) License ![]()